„I must study endgames!“ – these were Divya Deshmukh's first words after winning the World Cup final. She spoke generally, but at least three rook endgames she played in Batumi were strikingly similar. No, in this case I certainly would not call it a „promised“ anomaly, although I will of course introduce it to readers – this time it even reaches into history.
In the second part of the article about the Women's World Cup, we will focus on a certain type of rook endgames: those with a material advantage of a distant passed pawn. These definitely do not appear rarely in practice. Experienced readers also know that many universal rules can be applied to the most common endgames...
Why study rook endgames?
According to some authors and experts, rook endgames occur in up to 25 percent of cases when a game reaches an endgame! That is certainly a respectable number, which compels top-level, competitive players and coaches to prioritise studying them! Moreover, the study of rook endgames is so extensive that their material cannot be grasped as a whole, but must be divided into smaller thematic units.
In the second part of the article dealing with games of the Women's World Cup winner, however, we will focus only on one group. These are rook endgames in which one side has a distant passed pawn. How to handle such a strong asset so that its advance to promotion most resembles the famous Jamaican sprinter Usain Bolt? 🙂 Such a sprinter must be literally pampered and treated accordingly not only by His Majesty the King, but usually first by the strongest piece on the board – the rook.
On the other hand, it is equally important to know how to fight against a distant passed pawn. Rook endgames contain significant drawing potential. Together with queen endgames, they occupy on the imaginary podium the drawing potential second to third place. True, with a large margin, endgames with opposite-coloured bishops dominate.
It is therefore no surprise that rook endgames belong to the theoretically most studied final phases of the game. They were examined already by Philidor and in the 20th century by some of the most important theoreticians and authors: in the Soviet Union by Yuri Averbakh, overseas by Reuben Fine. Both Yuri Lvovich and, before him, Levenfish and Smyslov devoted a separate book or a significant part of a large work to rook endgames!
Current knowledge
is of course best revealed by the statistics of your results. If you generally do not handle endgames well, especially rook endgames, but want to improve, you have to start studying whether you like it or not you must. After all, do not lose heart, dear readers...
Even the founder of the Russian chess school and one of the most talented chess players Mikhail Ivanovich Chigorin (1850-1908).
had great problems with playing out rook endgames for a relatively long time. Another, more amusing example... with the caveat that such characters still exist today J: Some older readers may know the alleged statement of David Markelovich Janowski (1868-1927), twice challenger to Lasker. He supposedly expressed himself in this sense: „I don't need to learn endgames! If I play at my usual strength, none of my opponents will reach an endgame against me.“ 🙂 🙂
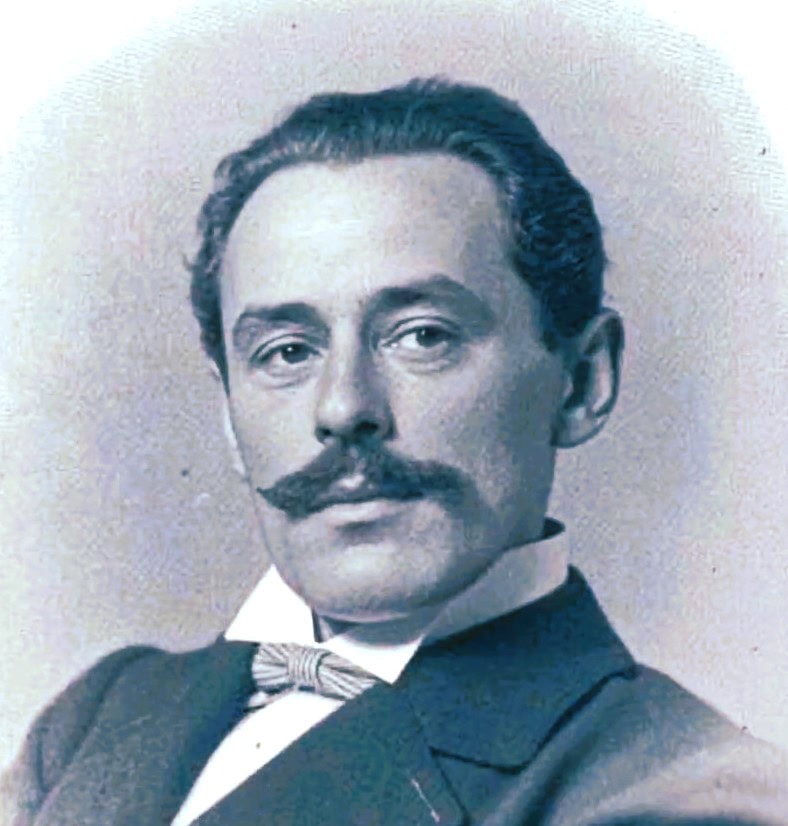
David Markelovič Janowski
However, we do not need to go far back in history. World Champion Gukesh also certainly has the biggest gaps precisely in the endgames...
Let us first examine your basic knowledge with a single diagram.
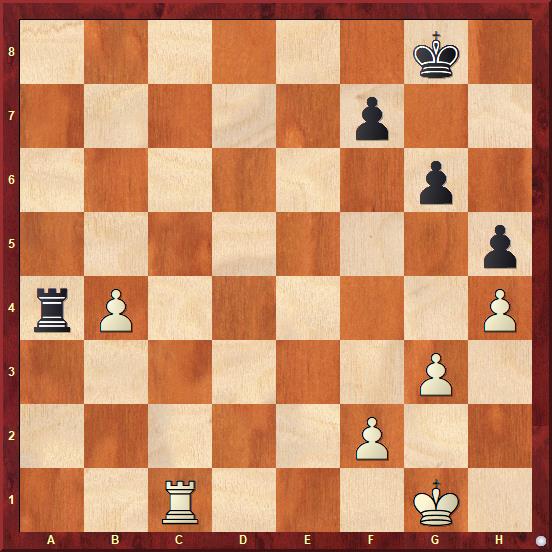
1/ How would you continue as White?
2/ How did they evaluate their prospects?
The solution is given in the second example of the player.
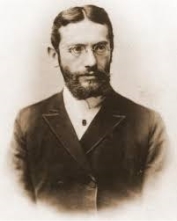
Tarrasch's rule
„In rook endgames, it is advantageous for the rook to be placed behind a passed pawn, whether it is your own or your opponent's.“ This is the gist of Tarrasch's rule.
In the position of our test, White wins only after 1.Rb1!
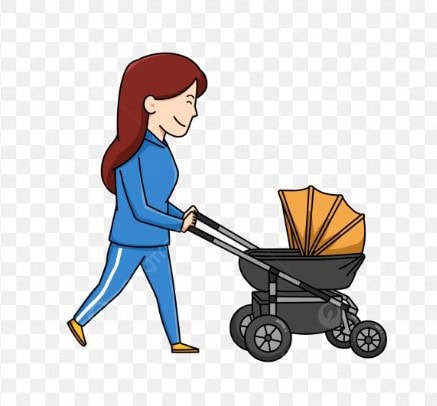
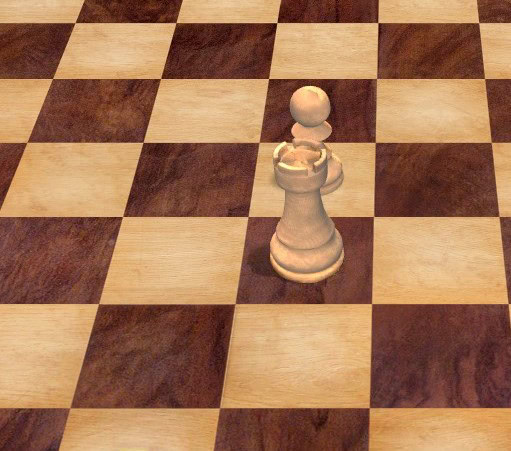
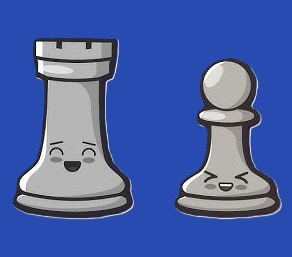
My cryptic picture represents nothing other than an analogy (I am afraid to write allegory 🙂) of Tarrasch's rule! Every mother pushes a pram in front of her, just like a rook pushes forward its pawn. Such placement (of both mother and rook) has other advantages: The baby (pawn) is under supervision; the mother (rook) also does not get in the way of the pram (pawn)!
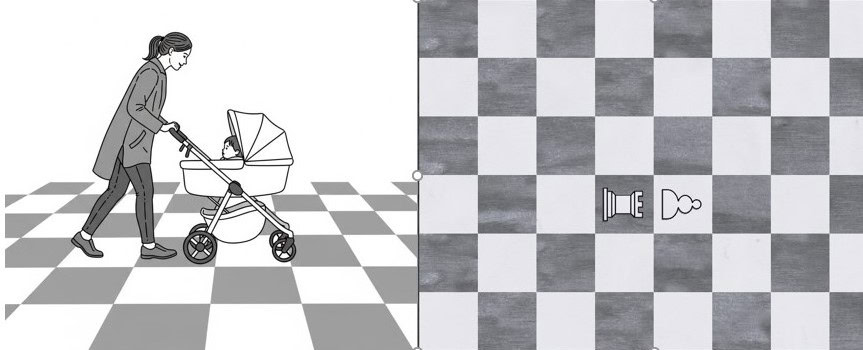
So hopefully a little more clearly… 🙂
Let's add:
- Just as a mother with her baby in a pram would not think of dragging it behind her, more like a horse-drawn carriage (which is somewhat uncomfortable and she would not have her baby under supervision), or standing sideways (which is suitable for a stop, checking nappies, but we are in a hurry), in our case the rook is placed behind the pawn!
- Later we will find out that the doctor was not inclined to racism 🙂. The rule remains valid even when the rook and pawn are of different colours!
So the general rule is: „“The rook belongs behind the pawn."
In summary: The rook should be placed behind the pawn, regardless of whether it is your own or the opponent's. As the pawn advances, the rook will gain more and more freedom in both cases, unlike a rook standing in front of the pawn.
Tarrasch's bitter experience
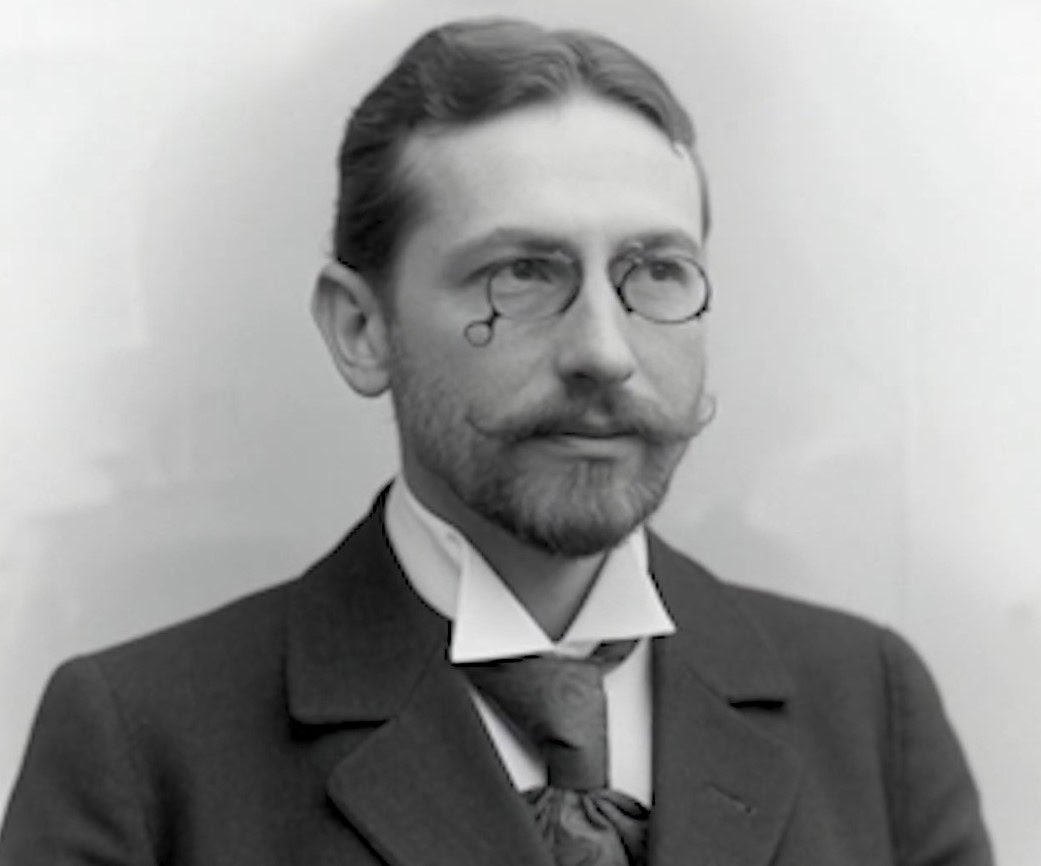
I grew up on Soviet literature. I am and will remain a follower of the Russian and Soviet chess school. But what I gradually parted with? The opinions many Soviet authors had about the doctor's work. He was often labelled a dogmatist and sometimes even insulted with harsher terms. In my opinion, Tarrasch (at least in many cases) knew well that concise and precise maxims are mere rules. There are always exceptions. In fact, Tarrasch was among the excellent didacticians!
Let us for a moment put ourselves in the role of a teacher and coach of young children – almost beginners. We would rather state the maxim: „A knight on the edge of the board is always badly placed!“ or „A knight on the edge of the board usually stands badly, but sometimes well.“
The teacher, of course, the second quotation laughs. In children's souls, at most a kind of smudge is created... Just like slogans, maxims must be catchy and easy to remember. The little word ever „will complete itself“ at the moment when the child or beginner strengthens and acquires enough knowledge.
The best proof is the following excerpt from a text that Tarrasch published at the end of his life. (In the text, I have highlighted the insights important to us at this moment.)
Tarrasch's Chess Newspaper No. 8, 15 January 1933
... When following these principles, derived from more than half a century of experience, one must keep in mind the well-known saying, that no rule is without exception.
In this regard, I had one bad experience. Decades ago, I established an important maxim: rooks belong behind passed pawns. After some time, I received a rather harsh letter from an amateur who bombarded me with the harshest reproaches. He had followed my rule exactly; he placed a rook behind a passed pawn, but... and the tempo was taken by a knight with check, and the rook was captured. I replied immediately – although immediately might be an exaggeration. I am not very quick at writing letters; a quality I share, by the way, with many chess players. A certain amount of laziness to write apparently belongs to good chess players.
In this context, there is a well-known story about Steinitz, who after a tournament accompanied Anderssen to the train and upon parting asked him: „Professor, if I ever wrote you a letter, would you reply?“ „I never answer letters!“ replied the old man in a convincing tone. „And I never write letters!“ Steinitz chuckled.
So I more or less promptly replied to the unfortunate writer that he should hang up chess and rather try playing yo-yo. Which in reality means that I would have replied like this if this meaningful game had already existed at that time.
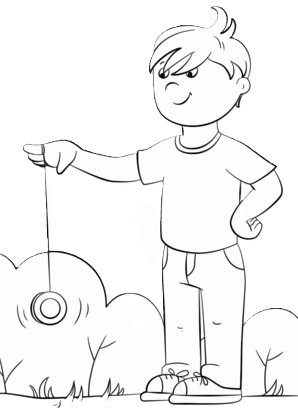
Another anomaly on the horizon!
I'm already nor does not surprise another intention of the Matrix! Or rather, as the AI claimed in my post „Is all this coincidence, or are we living in a simulation?“, anomaly, which also occurred during the preparation of the material for this work…
What was it about? On 18th and then 23rd July, Divya Deshmukh played two games that transitioned into rook endgames with a distant passed pawn on the ‚b‘ file (we will of course focus on those). She owned that pawn in both cases, and in both endgames she fought (ultimately successfully) for the win.
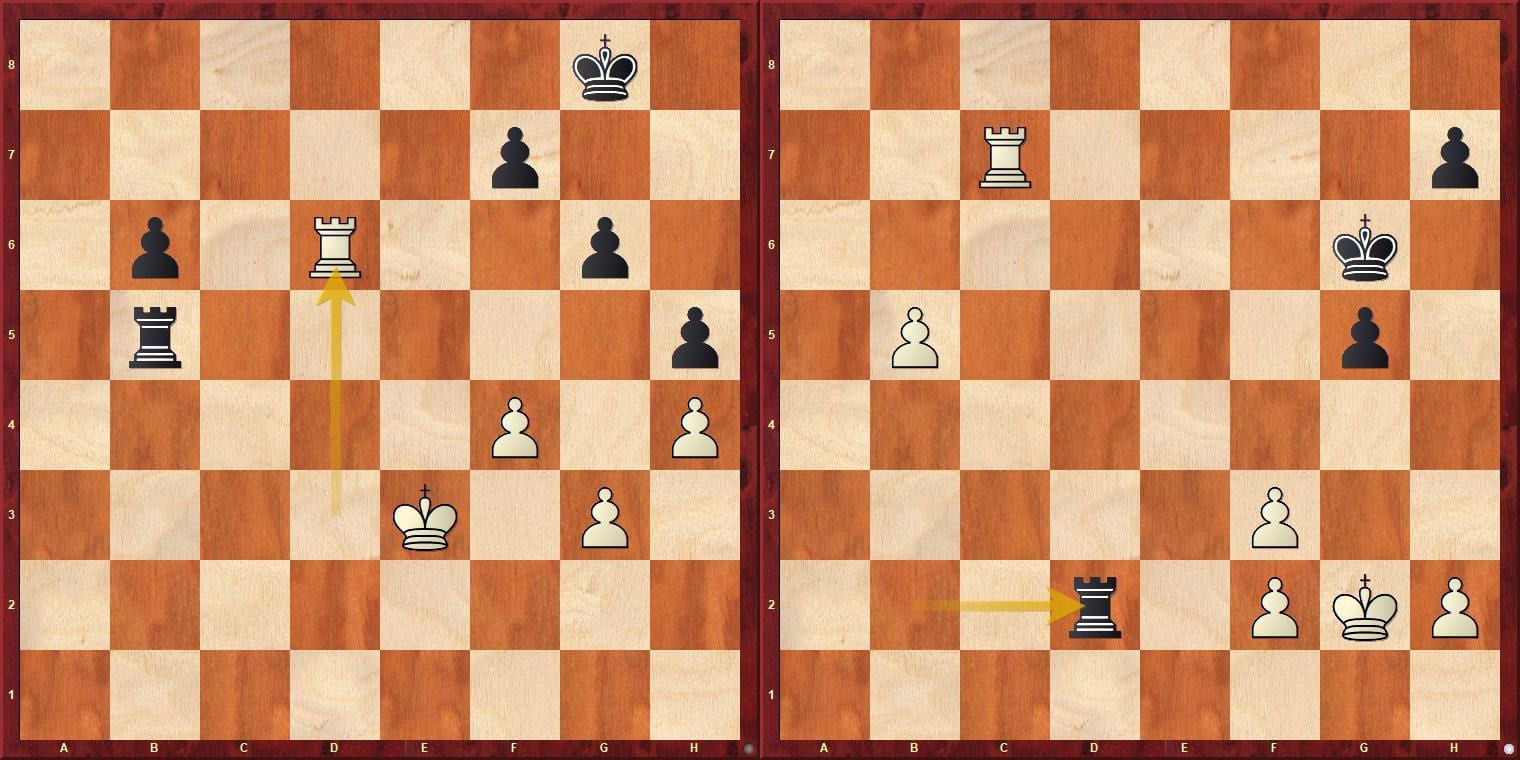
Of course, here so far it is not an anomaly, and perhaps not even a coincidence! As we already know, the frequency of rook endgames is considerable and distant passed pawns are their common companion.
On Wednesday 23rd July, our heroine advanced to the final and moreover had two days off ahead of her. She was waiting for her final opponent…
… At that moment I had already decided to write an article about the World Cup. „It would certainly also be appropriate to show readers both rook endgames,“ I thought to myself.
I was pondering how to divide the material and present rook endgames with distant passed pawns (DPP) in a didactically suitable way. I remember exactly that on Saturday 26th July. I decided on – let’s say – a broader scope. „I should introduce rook endgames with DPP starting with the ‚a‘ pawn, familiarise readers with the most famous game, and only then move on to the DPP on ‚b‘. That way readers will better understand that the b-pawn gives greater chances to win. That will be correct in every respect,“ I thought to myself contentedly. I then moved the famous game into my working database.
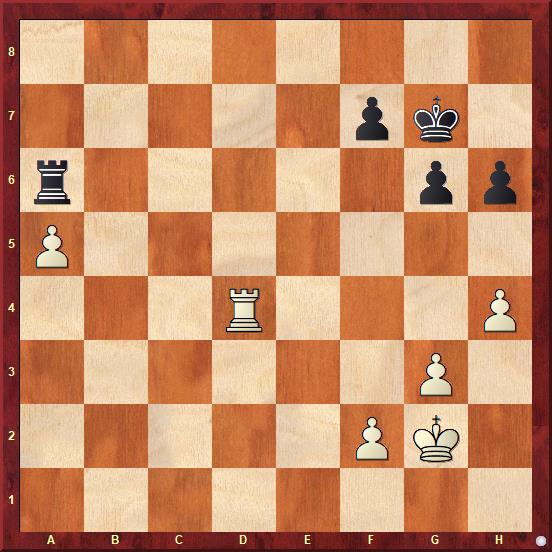
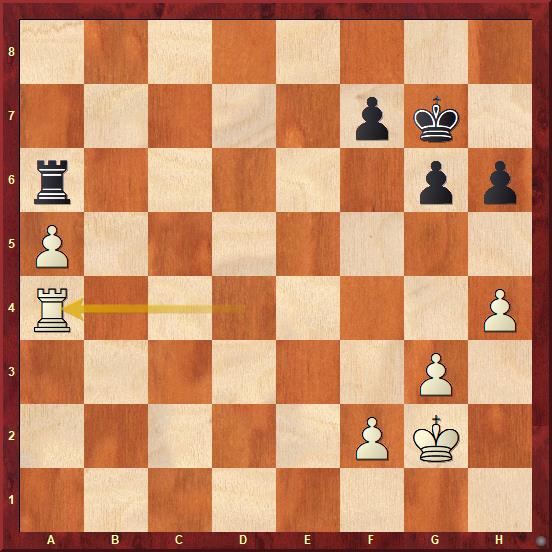
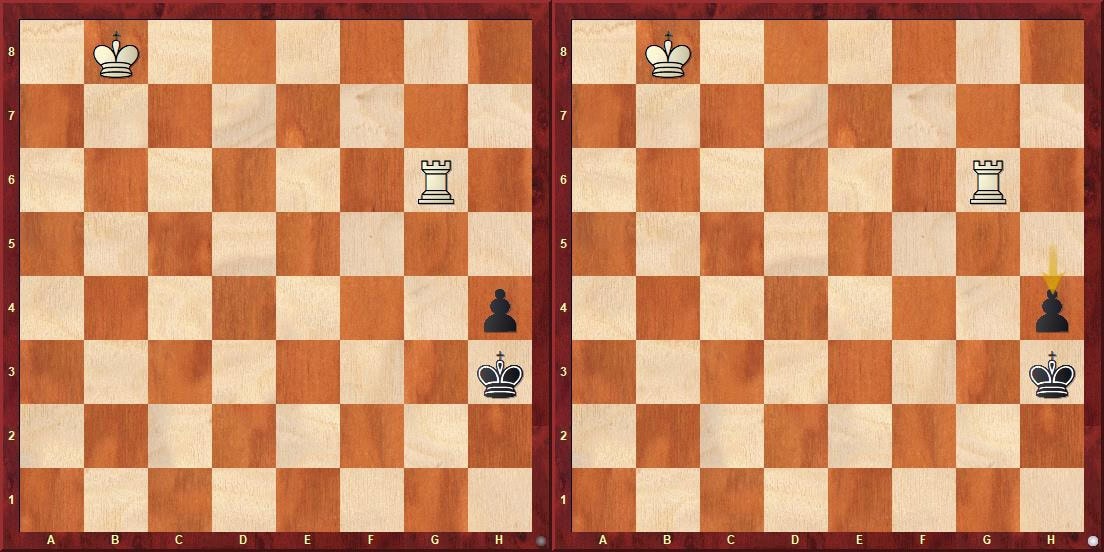
The diagram shows the famous position from the last 34th game of the World Championship match Alekhine vs. Capablanca (Buenos Aires 1927). Alekhine acted according to Tarrasch’s postulate playing 54.Ra4!, won the game and on 29 November 1927 became the 4th world champion.
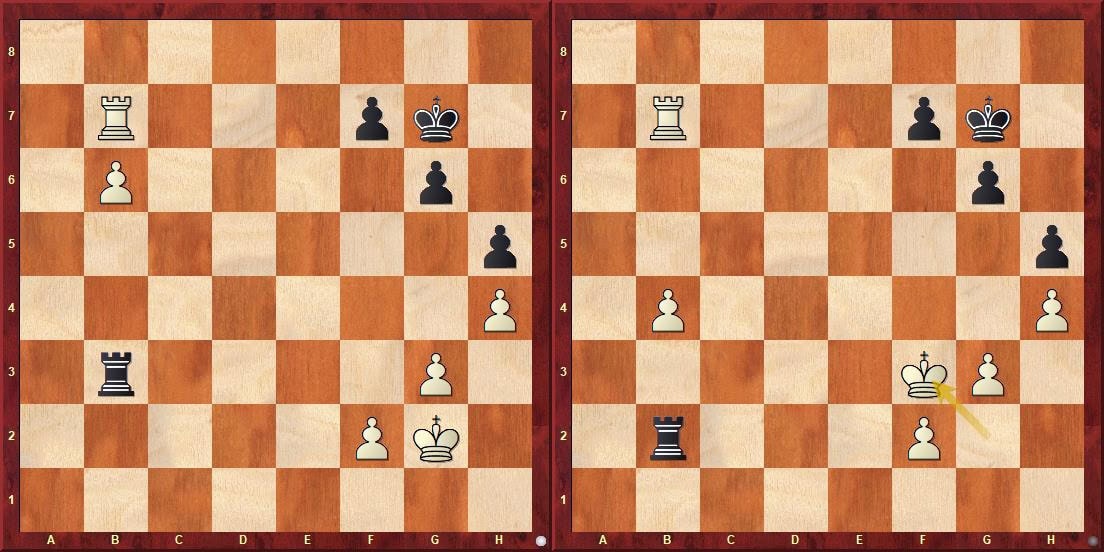
Let us return to the present day. Two days later after my preparation, 28 July 2025, in the second game of the tiebreak of the World Cup final match, arose in the game Koneru Humpy vs. Divya Deshmukh after Black's 49th move the following position
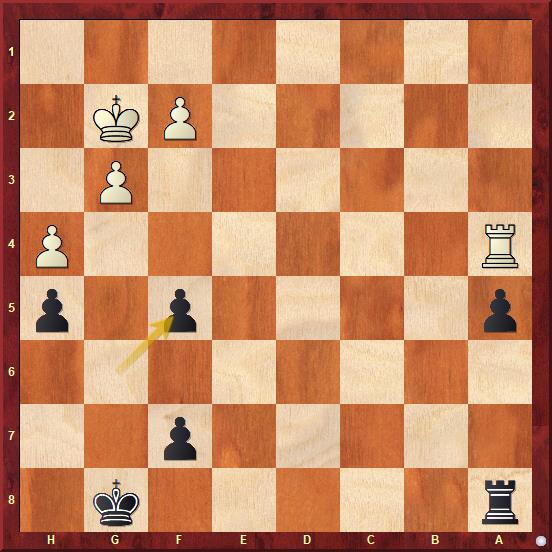
For clarity: If we invert the colours and then combine the diagrams from both games, we can easily compare both positions!
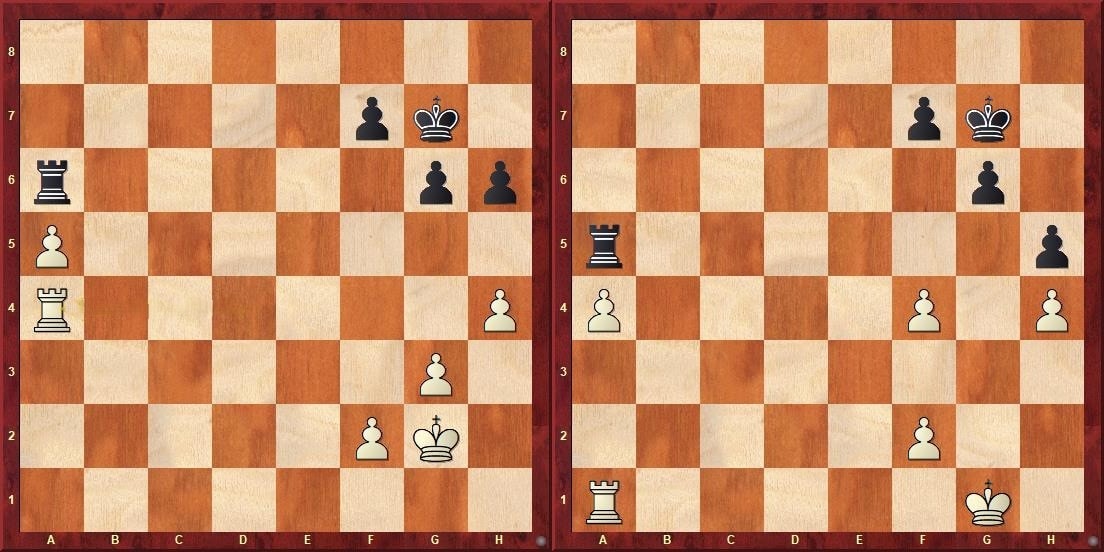
What could be the probability of the above-described event??...
We know that the position in the left diagram is winning for White. However, I will pose a question about the diagram on the right. How and why do you think the game would end with the most accurate play from both sides?
An endgame nearly 100 years old, one of the most famous and therefore also the most analysed, should be known to every competitive player. Below, readers can replay it with notes from Alekhine himself, but also from Kasparov, for example. The similarities with the World Cup rapid final game were noticed not only by me but also by the excellent analyst Grandmaster Daniel King. Therefore, I first offer his didactically excellent video analysis.
Now to the current anomalous the game. Let us first look at Sagar's video with a short final analysis, which he now often adds to broadcasts, and then a thorough commentary. Sergei Makarychev analyses the endgame from about the 35th minute of the video. (YouTube currently adds English AI dubbing to some videos. So for readers who do not prefer Russian, there is now an option to listen to the dubbing directly on my website.)
The first example in the player analyses the endgame itself in detail, while in the second we can enjoy the entire final tiebreak game.
Pawn formations on the flank
Games are not won only by heroic distant passed pawns (DPP) and the correct rook. Dear readers, have you ever asked yourself why the pawn formations on the kingside of very strong players so often look exactly like this in endgames?
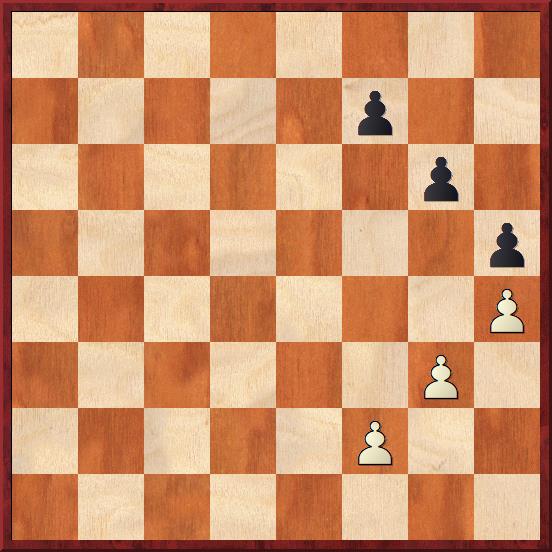
„There must be something to it!“ says the less experienced chess player. That is true, but what and why? The ideal pawn structure we see in the working diagram is usually not only the most advantageous in rook endgames, but generally! Apart from various exceptions (for example, as a complement to this pawn formation a white dark-squared bishop would not fit well) it is a universal setup. Experienced and strong players make sure that already on the eve of the approaching endgame they arrange their pawns exactly like this.
If we focus on rook endgames, then we notice these advantages of the given pawn structure.
- The pawns protect each other, but at least one of them will always lack the protection of its comrade in arms.
- We place the base of the pawn formation, the f2 pawn, as close to the centre as possible. The king can thus be centralised and at the same time take care of the base.
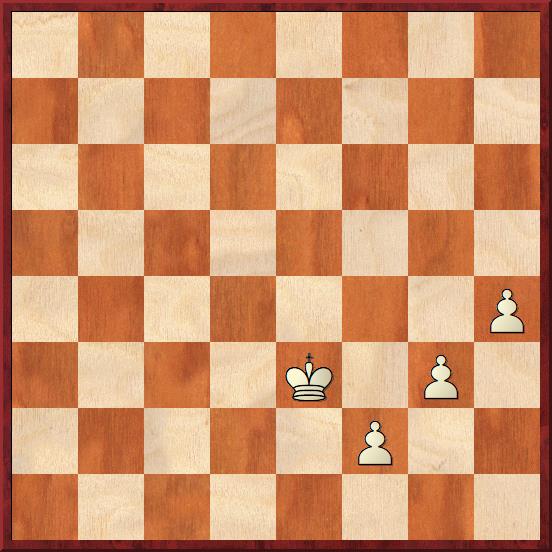
- The f2 pawn creates a suitable shield in situations where the king stands on the first or second rank.
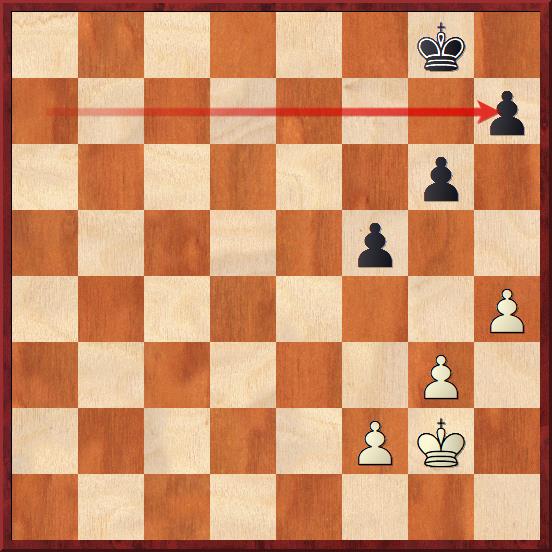
- If the enemy rook bares its teeth at the pawn formation and the pawns’ lives are at stake, a hearty snack awaits (clearing out to the strongest piece on the board for a full 5 moves. For example Rxf2 - Rf3 - Rxg3 - Rg4 - Rxh4. There are formations where the capture will also last 5 moves, but in most others the consumption of pawns by rooks takes a shorter time – fewer moves, that is 3 or 4.
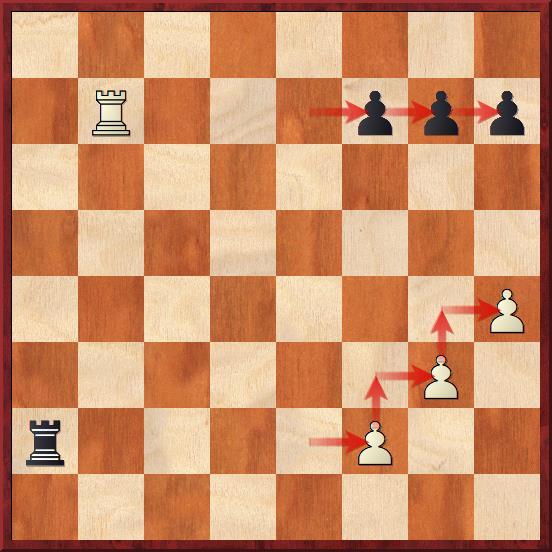
- The pawn structure is sufficiently mobile and can even help itself. For example by advancing f3+g4; with the help of the king then perhaps f2-f4-f5, as we saw at the end of the Alekhine vs. Capablanca game.
- The mobility of the pawn structure often not only saves the weaker side, but is also part of defensive plans.
Under otherwise comparable conditions…
Maybe it is just my impression, but… in no other literature have I noted such frequent mention under otherwise comparable conditions, than in the works of Luděk Pachman! What is it about? The Czechoslovak and later German grandmaster and excellent didactician made sure that his explanations were clear and understandable. At first, perhaps for someone, the mysterious phrase simply means that the rules of the examined problem in the endgame apply only then, if the conditions are approximately the same actively placed pieces or comparably good pawn structure
Let's look at the following diagrams.
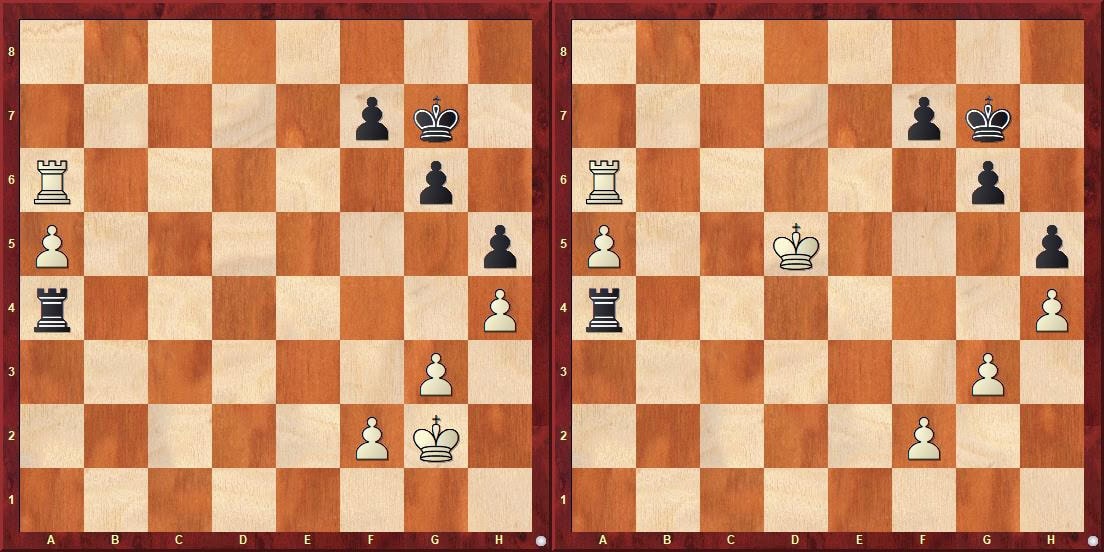
In both cases Black owns the correct rook, which therefore stands behind the pawn. In the left diagram the otherwise comparable conditions are fulfilled: both equally good pawn structures on the kingside, with the kings not yet involved in the fight. Black will thus achieve a draw, as we will see below.
However, otherwise comparable conditions do not prevail in the right diagram. The activity of White's king, who is about to support the h-pawn, will easily decide the game.
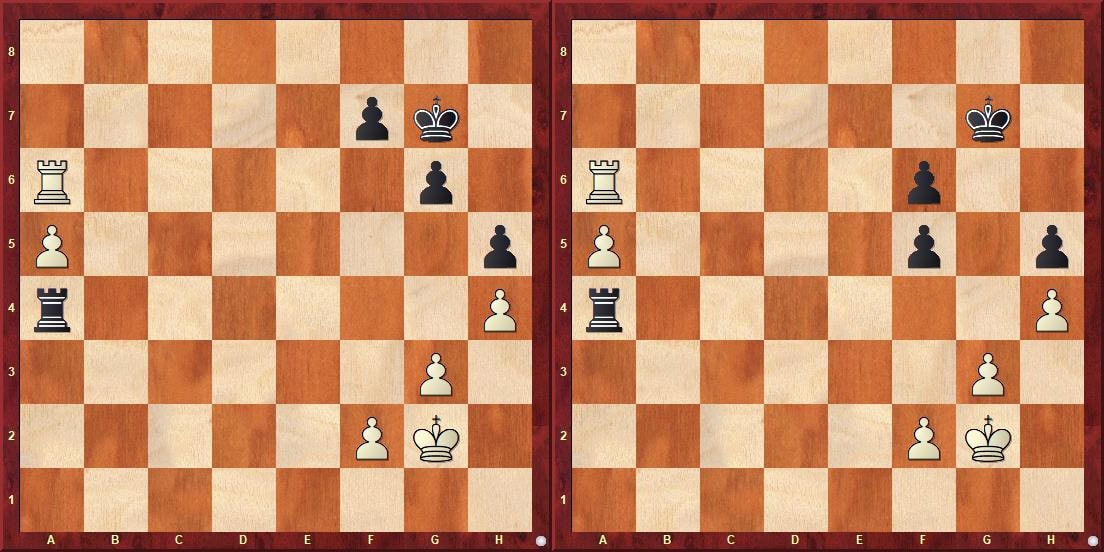
Otherwise the same conditions are not fulfilled in the right diagram even when the stronger side's king is not yet fighting. Here the culprit of the lost position is Black's miserable pawn structure. I might add that if the pawn on f5 stood on f7, Black would probably still achieve a draw despite the equally bleak prospects! have He would achieve it!
Tarrasch's rook works wonders, but…
So now we know Tarrasch's rule, we have adopted it, and we can focus more closely on rook endgames with a distant passed pawn. I remind you that the rule naturally has a wider application. We do not use it only in pure rook endgames, but also in endgames with more pieces. I believe Karsten Müller and Frank Lamprecht state in their seminal work that the number of endgames involving rooks even approaches 60%!
Let us look at the diagram below.
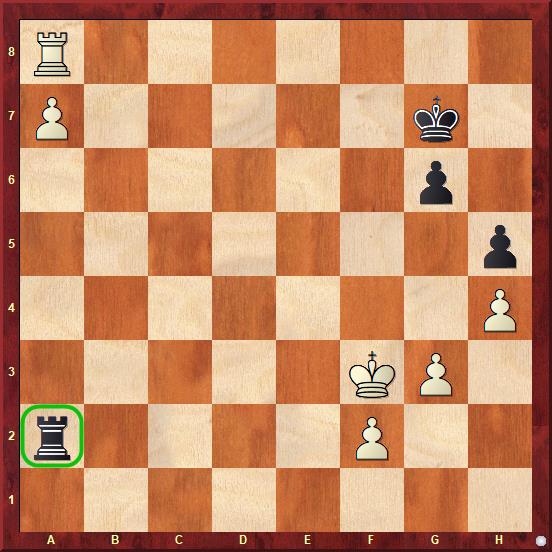
Black's rook has so much energy that it is enough to hold a draw even in a position two pawns down! However, other conditions must also be met for this to hold.
The worst RPP is (not only) in rook endgames the edge pawn. If you already own it and do not see another clear plan, it is not advisable to trap your already bad rook with the move a7. With the pawn on a6, White's king should have somewhere to hide from the checks of the hyperactive rook, and White would win the position with two extra pawns.
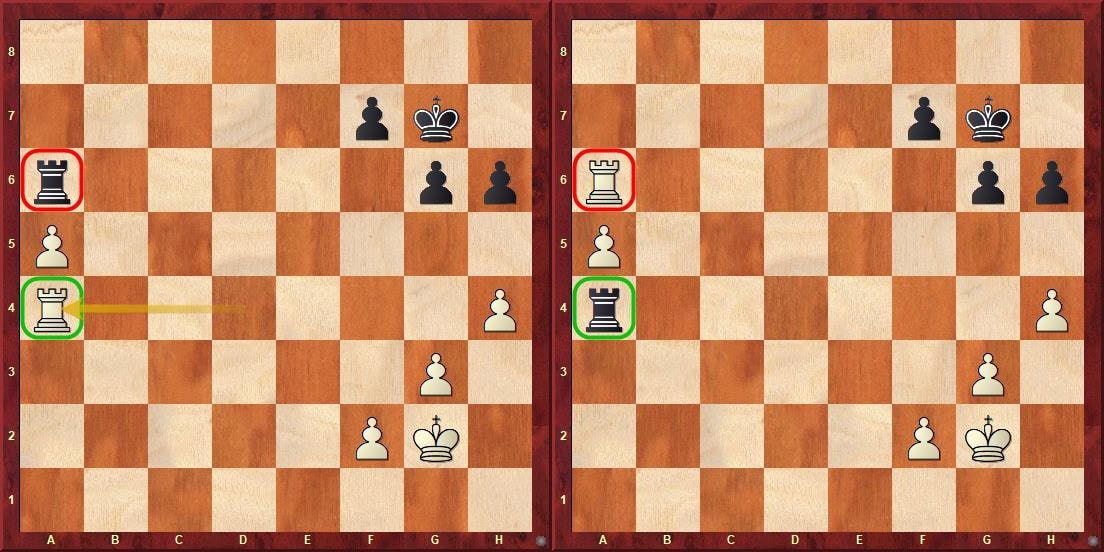
The position in the left diagram is already familiar to us. However, in the second one the rooks are swapped! Then the correct Tarrasch rook (standing on the seventh rank behind) belongs to Black, who, as we see, is to move. Luděk Pachman in his book from the early 1990s recommends Black to continue with a strong prophylactic 1…Ra3. Let us add that Black can achieve draws in many other ways as well. Pachman's analysis seems to me didactically the most precise, which is why I chose it as the introductory demonstration of the defence and supplement.
Back to basics
Under otherwise comparable conditions, the active side with the bad rook will finally have two options on how to continue the game.
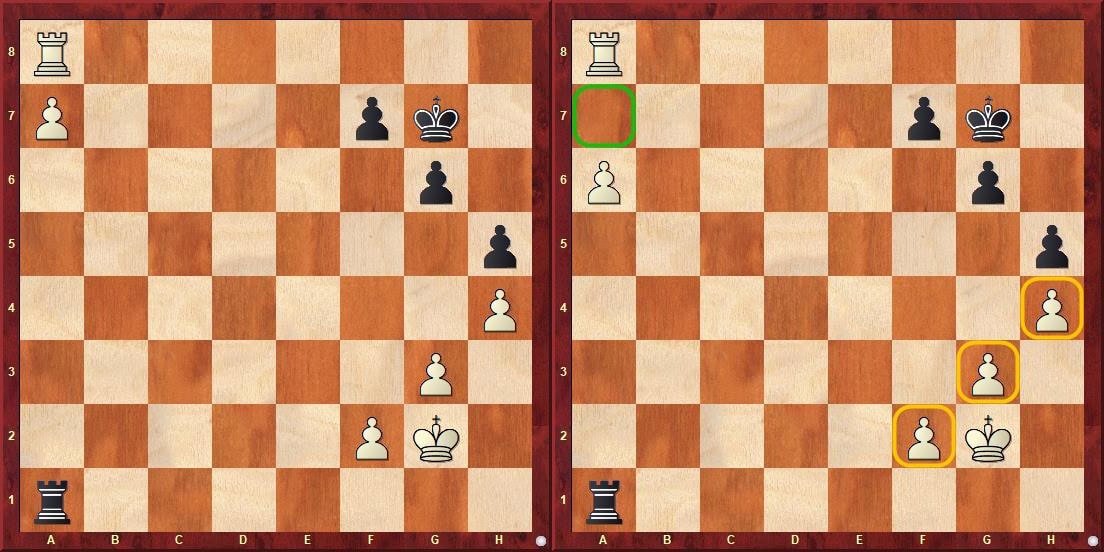
Most less experienced players simply run with their hero as fast as they can, and… thus deprive themselves of even the minimal practical chance to win. After 1.a7?! it does not pose a big problem for Black to hold the game. White has no plan to strengthen the position. The king's excursion to his faithful ones on the queenside will end either with constant checks or retreats of the black rook along the a-file (which it must not leave, most often due to a combination with the idea of freeing the a8 square – Rg8+! and a8Q).
The only practical chance is to leave the pawn on a6 and reserve the a7 square as a shelter for His Majesty (see the diagram on the right). This way White has a real chance to achieve the advance of a distant passed pawn, for which Black will have to sacrifice the rook. The problem, however, is that in the position in the right diagram the black rook is not tied to the a-file and can go hunting pawns on the kingside. Before White marches the king to a7, the rook – just before its demise – manages to snack on one or sometimes even two pawns.
The opponents almost always reach a situation where Black creates one or more passed sprinters on the kingside. They, together with the king, fight against the (initially distant) white king and rook. Even less experienced players understand that in such a race the strictest referee is Time. Every tempo counts!
More complex examples and treats for connoisseurs
Although the last originally Pachman analysis contains many variations, common situations with exemplary pawn structure on both sides and the stronger side’s bad rook are relatively easy to handle.
As the stronger side in the game, we can choose whether to push the pawn all the way to a7 (but then every somewhat literate opponent will defend today), or to leave the pawn on a6 (this is how stronger players try to win the game).
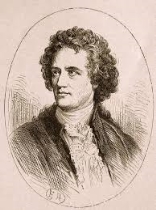
But as Goethe already said: „Theory is grey, but the tree of life is ever green.“
In practice, the game does not always develop as we imagine. For example, the king can already be in the centre at the start of the rook endgame. Usually we can be glad, but…
Even more often it happens that the pawn skeleton on the kingside is, let’s say… far from ideal!
The basic postulates mentioned above naturally remain valid, but at the same time the first priority is: „Every position is different!“
The following diagrams, questions and of course the solutions you will find in the examples below are primarily intended for stronger and more experienced chess players. In some cases, they will literally be treats...
Let's start with the most difficult one. The position in the left diagram below arose in the game Tal,M vs. Gipslis,A Jurmala 1983.
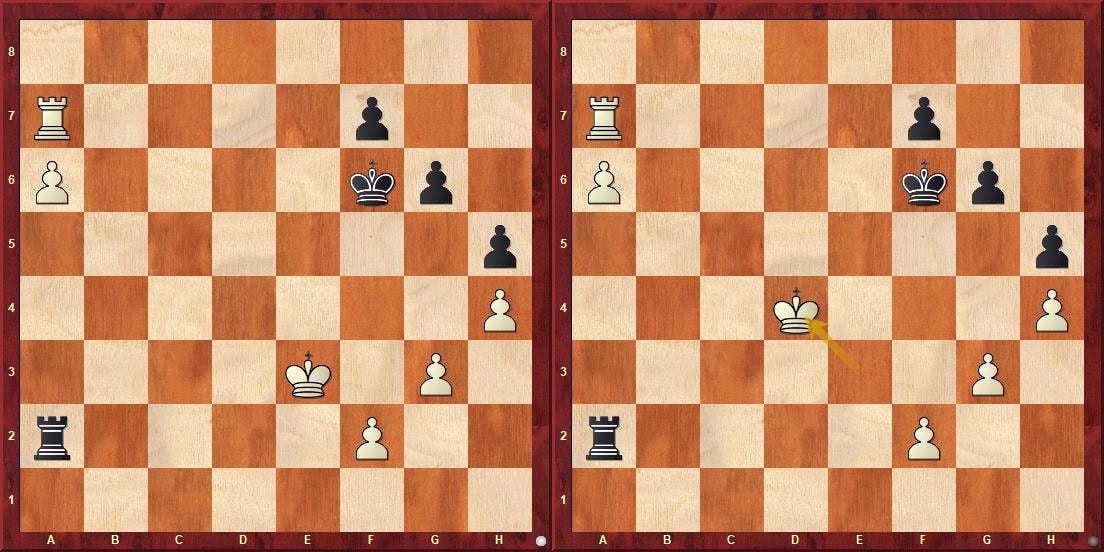
Mikhail Nechemievich apparently considered the position (like many others) as still a draw. Therefore he played 39.Ra8 followed by Kf3 and Ke3, after which he accepted a draw. I add that Tal in 1983 was no longer Misha of 1960 nor nor the world number two by rating in 1973. It is therefore not excluded that he simply did not feel like playing on., nor the world number two by rating in 1973. It is therefore not excluded that he simply did not feel like playing on.
Task 1: Tal could have tried to use the more active king and continued with 39.Kd4. What result would such a manoeuvre lead to with best play from both sides?
If it is not within the powers of both sides to achieve at least a decent pawn formation on the kingside, then mostly more the defending side suffers! Let us look at the diagrams below.
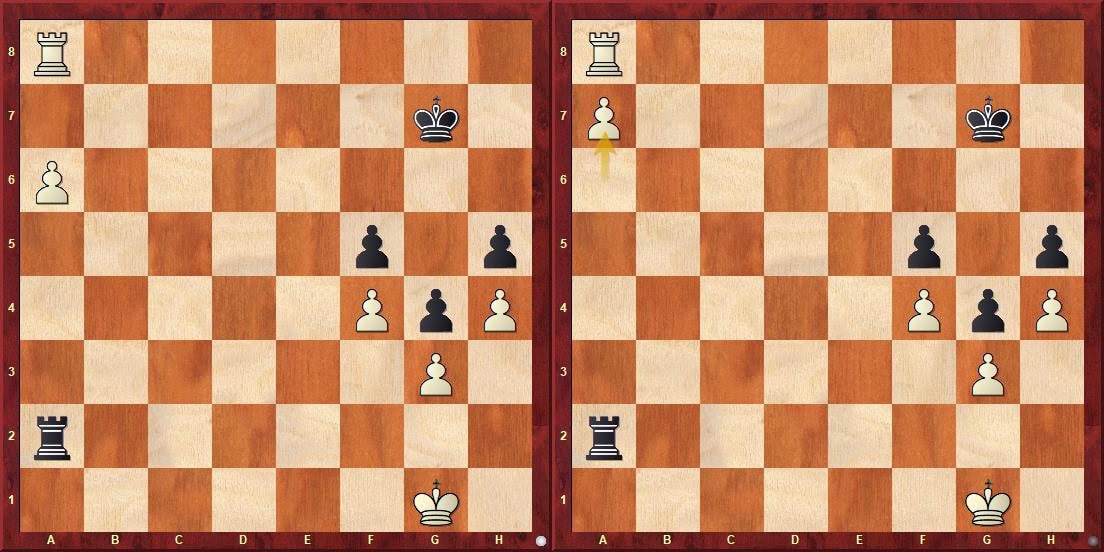
After 1.a7 the black king remained pinned to the squares g7 and h7 and the rook cannot leave the a-file.
Task 2: Is the position drawn or can White win? And if so, how? Suggest a plan!
The real gem (among other reasons perhaps because it is actually a kind of exception) is the third example. I took it from the excellent, now almost historical, publication „Теория ладейных окончаний“ (Theory of Rook Endings), published in 1959 by Grandmaster Grigoriy Yakovlevich Levenfish and former World Champion Vasily Vasilyevich Smyslov. The positions in the diagrams arose in the game Unzicker,W vs. Lundin,E played at the 11th Chess Olympiad in Amsterdam 1954.
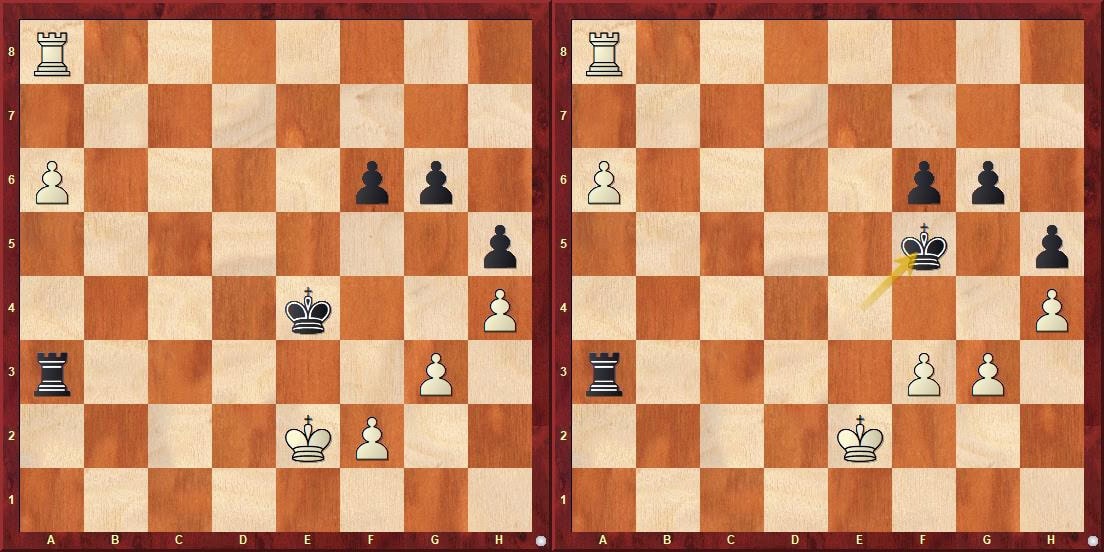
According to Pachman’s approximately comparable conditions Black should be rather more satisfied in the position of the left diagram. Well, if it were his move, that would certainly be the case. However, White continued in the game 48.f3+! (at the same time the only winning move), and after 48…Kf5 the position of the right diagram arose.
At first glance it may seem impossible, but the West German grandmaster managed to discover based on so-called pattern thinking winning manoeuvre. Will you manage it too?
Task 3: describe White's method of winning.
A small hint for the second and third tests can be found by clicking Hints for tests 2-3
An even stronger player
In most endgames belongs the outside passed pawn among problematic! A simple example is the basic king and pawn versus king endgame. We do not need to talk about any critical squares here. The weaker side draws simply by occupying or approaching the corner in front of the pawn; and that is not all… An exception is already strange knight endgames. For the knight, the rook's outside passed pawn is often a real disaster. Well, the chessboard has its edge 🙂. .
If we dominate the material advantage in the endgame the passed pawn ‚b‘, we have significantly better chances to win. Of course, with the correct Tarrasch rook we will win always, but also in rook cases bad our chances (let us recall - under otherwise comparable conditions) are relatively high.
Black, with precise play and the ‚correct rook‘, can also achieve a draw here. However, it is certainly no walk in the park. The position in the diagram on the right was not even held by the 9th world champion Tigran Petrosian himself!
Before we proceed to the analysis of two of Divya's games, I have prepared two examples for the readers. From these we will actually learn everything necessary both about the strategy of play for both sides and we will verify (or be reminded) who is very often the true master in these types of endgames!
The first example comes from a correspondence game (see diagram on the left). In the mid-1980s, it was analysed in detail by Yuri Averbakh himself in the pages of the Soviet monthly. Let us read what he wrote in the introduction to his analysis. (I have inserted diagrams into the text that illustrate Averbakh's conclusions and also highlighted key passages.)
Yuri Averbakh: Recently I became acquainted with the ending from the game Hollis vs. Florian, played in the 7th Correspondence Olympiad. The ending was published with comments by A. Hollis in the magazine British Chess Magazine.
A similar rook endgame with an extra pawn on the wing is not an uncommon guest in contemporary tournaments. It is claimed that a knight pawn gives more chances to win, than a rook or bishop pawn, but with correct defence the game must also end in a draw here. However, defence is usually complicated, difficult, and requires great precision from the defending side. The result of the game often depends on one single tempo!
The diagrams demonstrate a relatively common conclusion of games or variations of these rook endgames. Black ultimately had to give up the rook on b8 for the passed pawn, but in the meantime created a „sprinter“ on the other side of the board. As we will see in the analyses, the result often really depends on a single tempo! In the left diagram Black to move can still achieve a draw, on the right – if White moves – wins the same position leads to a loss! Dear readers, can you find and calculate it?
One of the advantages of the passed pawn ‚b‘ compared to passed pawn ‚a‘ can also be the fact that here the king captures the rook on b8, and is therefore one square closer to the last frontline…
There are many cases where the material advantage decided, but analysis usually showed that the defence could have been strengthened.
In the given endgame White also achieved success, although in Hollis's analyses we do not find a point where Black made an inaccuracy, i.e. where the defence could have been improved. It might then seem that the endgame strongly undermined the previous theoretical conclusions! Let us first look at how the game continued…
Yuri Lvovich therefore tried in the analyses to prove that Black as the weaker side can achieve a draw! (The condition is, of course, ideally placed forces.)
It is necessary to emphasise that the passed pawn ‚b‘ gives the greatest chances of winning, and this is because it is still sufficiently distant, but at the same time does not have the known drawbacks of passed pawn ‚a‘. The stronger side here has the option to hide the king, for example, by manoeuvring along the ‚a‘ file.
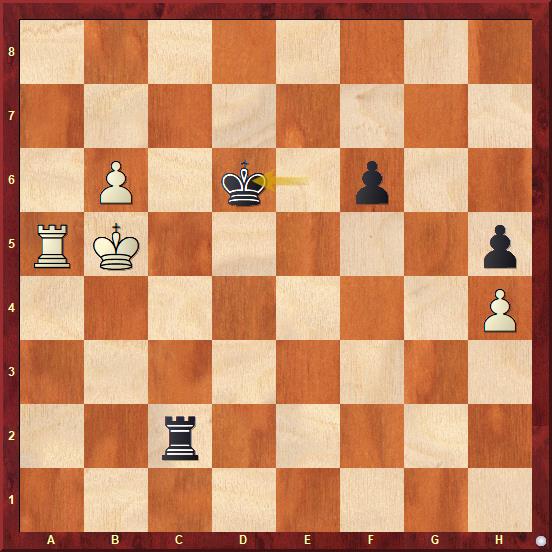
A clear demonstration of the advantages of passed pawn ‚b‘ compared to a rook pawn. Although Black's centralised king became a full-fledged fighter, White wins thanks to the manoeuvre 62.Ka6!
Let us first get acquainted with a significant analysis of a correspondence game, which contains many lessons! In the first example I left Hollis's and Averbakh's analysis, supplemented by further analyses, unchanged. Analytical errors are marked only by „black medals“ – rectangles.
The following Averbach's analysis of the endgame of the game has now been corrected. Here too, we can clearly assess how complex the endgame actually is. Not only did the opponents fail to handle it in the early 1970s, but also the winner of the game himself later on. Even Averbach's analysis contains analytical errors, although this can simply be explained by the fact that in the mid-1980s, when the article was published, one of the greatest endgame experts focused mainly on a single specific position – Hollis's previous analytical mistake! It was only engines that made everything completely clear.
Even Petrosian himself failed!
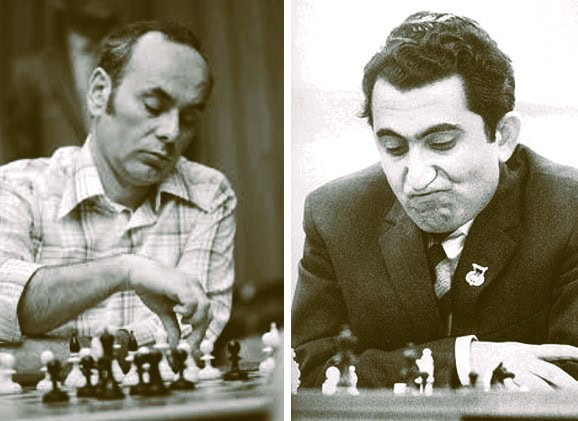
Perhaps the best proof of how difficult it is to defend in practice an endgame with RRP ‚b‘ is the conclusion of the 12th game of the 1974 Candidates quarterfinal match. In it, the former world champion Tigran Petrosian faced the Hungarian grandmaster Lajos Portisch. The Hungarian Botvinnik,, as Portisch was nicknamed, managed to win the endgame and equalise the match score to 6-6. Despite Petrosian's gross blunder, which strikingly resembles Black's failure in the previous game, in my opinion the most interesting aspect in the endgame itself is the defensive plan, that Tigran Vartanovich chose in the endangered endgame! So let us first look at a very interesting moment.
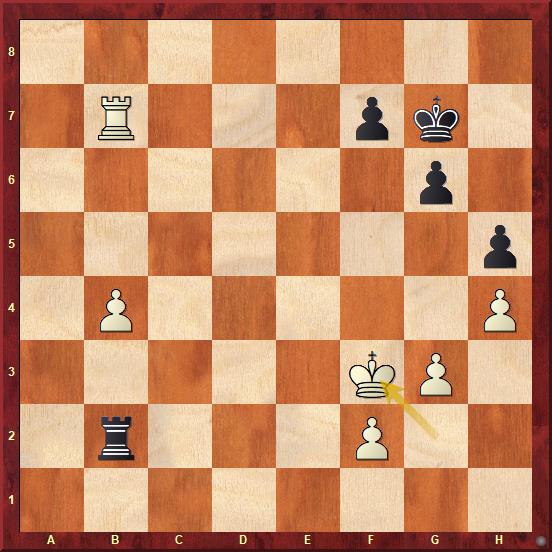
White has just stepped in with the move 47.Kxf3 into our endgame. I must admit that I had forgotten this game and the concluding play, which I once saw somewhere, and I had no intention of including it in my work. Therefore, it was also a surprise to me when I (again) saw how the former world champion continued. What followed was 47...Kh6!.
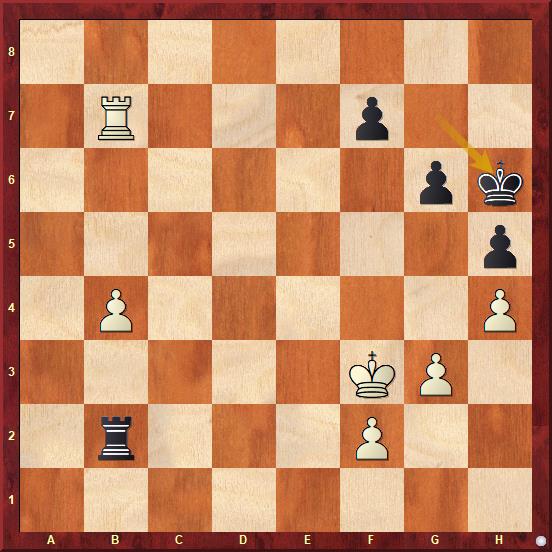
Although Black has several continuations available here leading to a full theoretical draw, some engines rank Petrosian's move as their first choice! A question for you, dear readers. With what intention (plan) did the former world champion continue in this way?
One cannot fail to notice analogous blunders in both games!
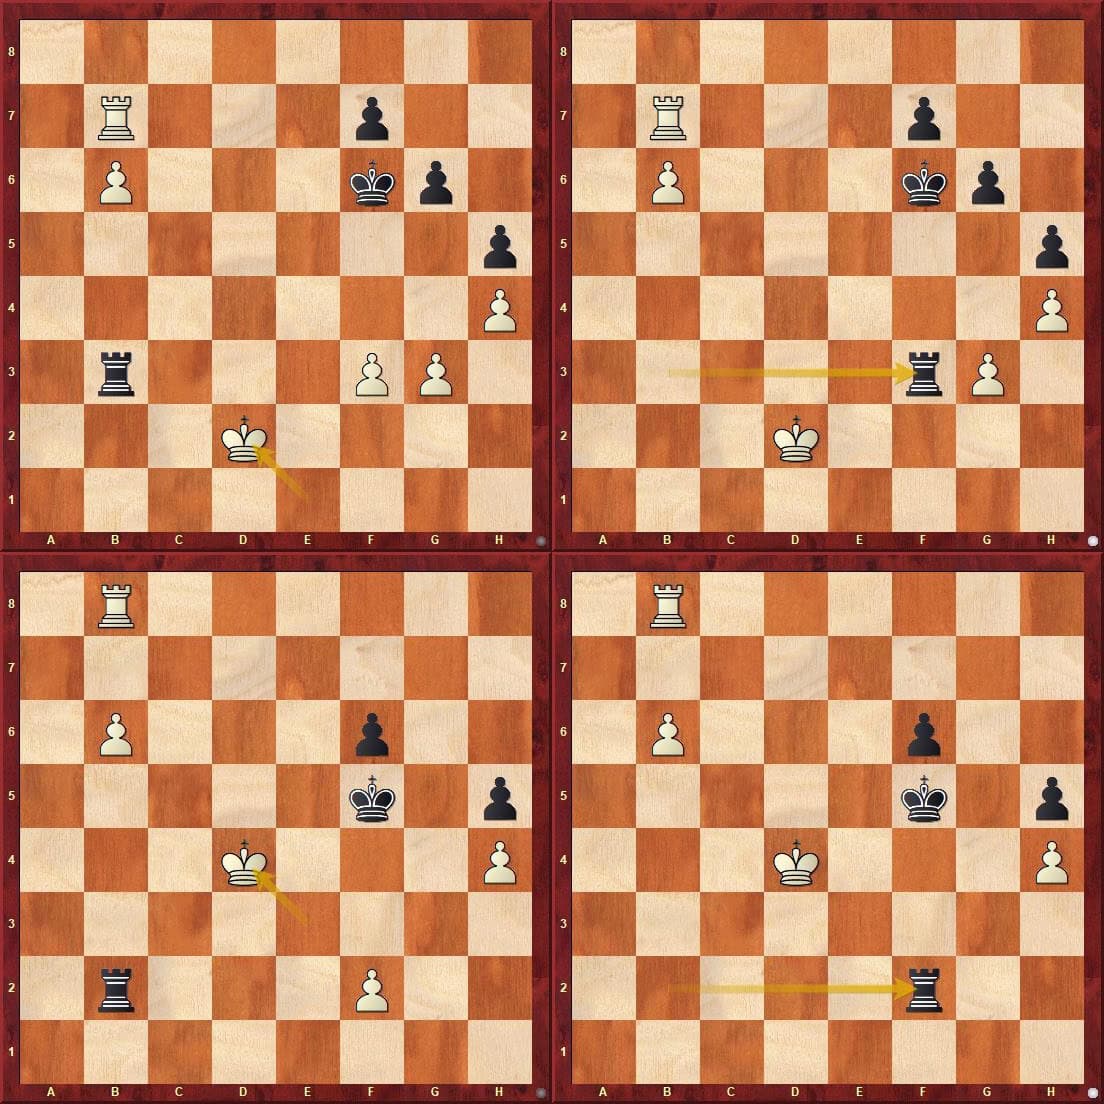
Black paid the price for the Otesánek syndrome of overeating the rook at the least opportune moment: 43…Rxf3?? a 55…Rxf2?? in the diagrams on the right.
We must learn endgames!
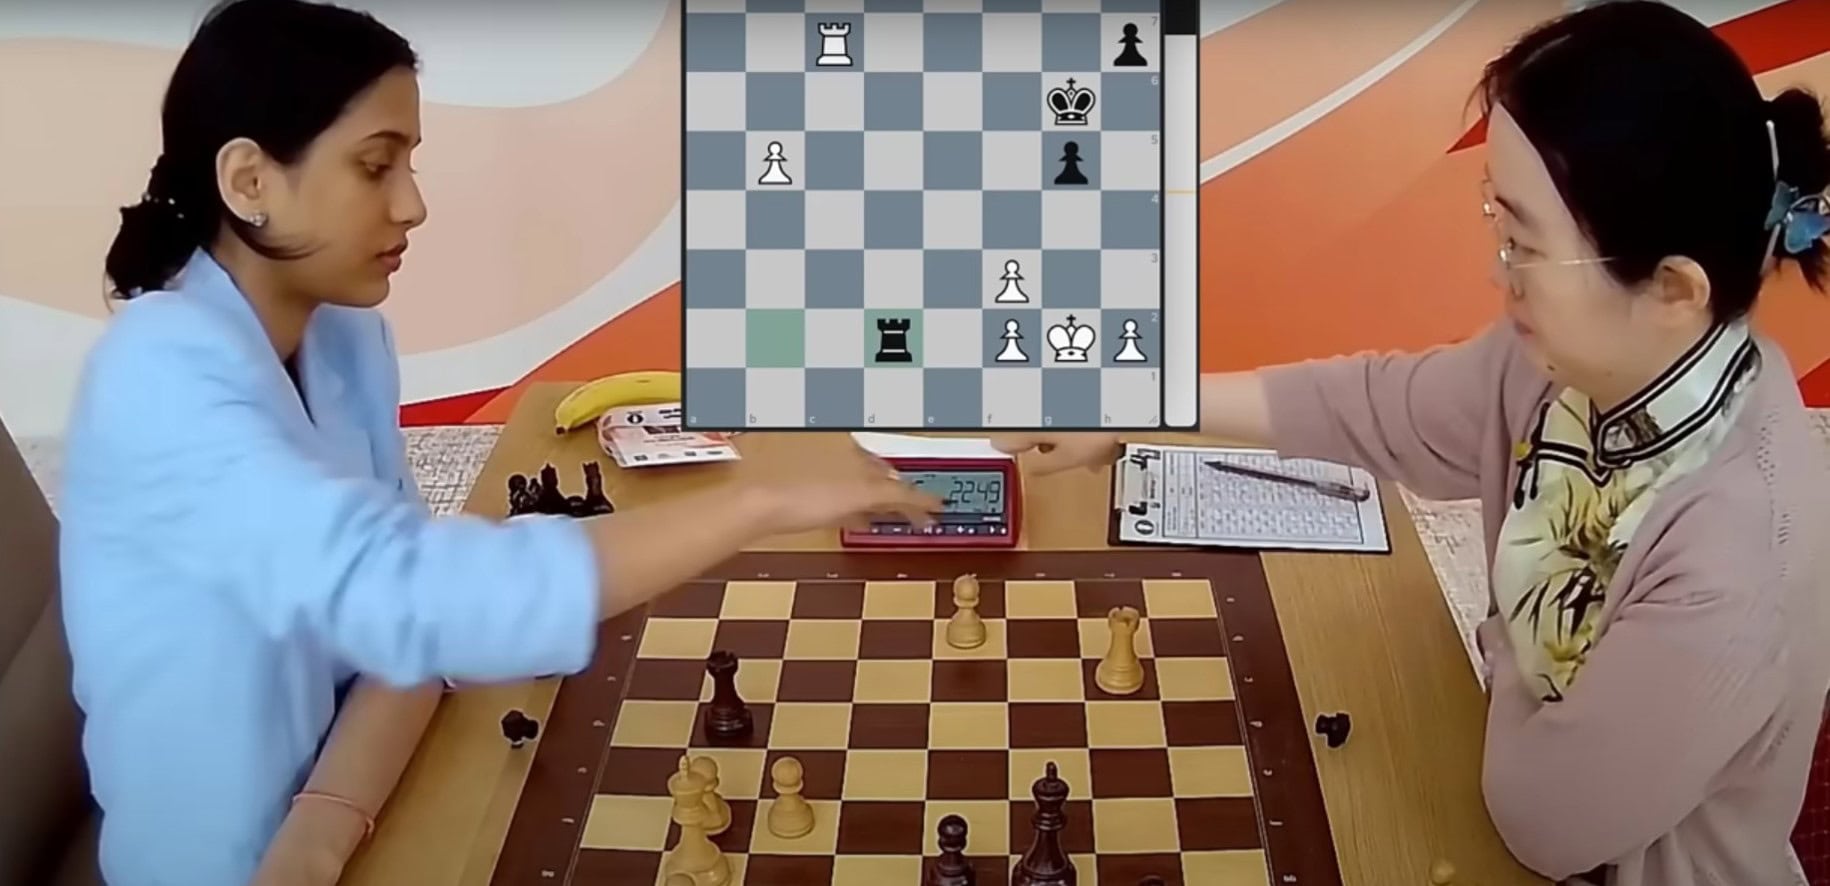
„He probably won't listen to you, doctor!“ the renowned masters of the past and spectators turn to Tarrasch, who, along with Caissa, is also watching the battle closely. Divya has already decided to blitz...
Now that we have learned enough, we can not only mechanically replay those two games of Divya, in which she fought against WGM ‚b‘, but also easily evaluate the positions and find the mistakes both opponents made.
Let us first look at the diagram from the round of 16 tiebreak Zhu, Jiner vs. Divya Deshmukh.
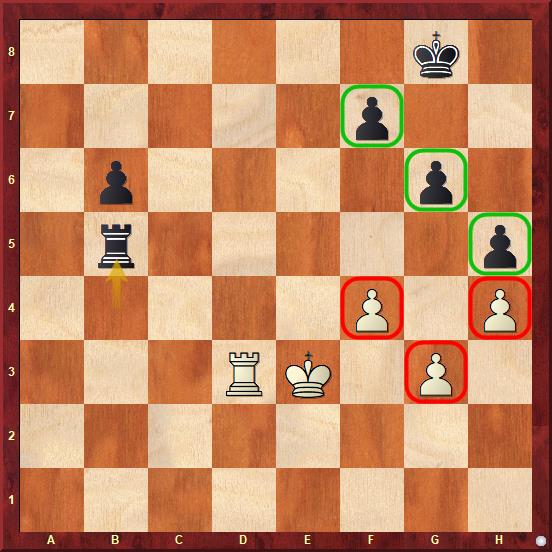
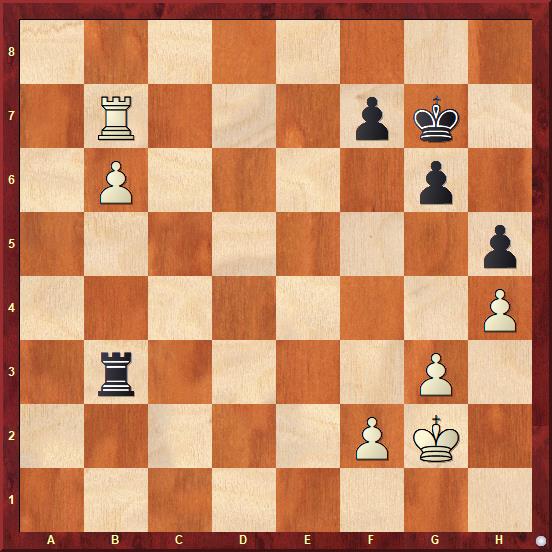
Black has just played 63…Rxb5 and captured a pawn. She eventually won the game, but my question here is more theoretical. How would you evaluate the position? With the most accurate play from both sides, will the game end in a draw or is it already indefensible?
At the end of the article, let us return to the promised detailed analysis of the rook endgame from the semifinal game Divya Deshmukh vs. Tan Zhongyi.
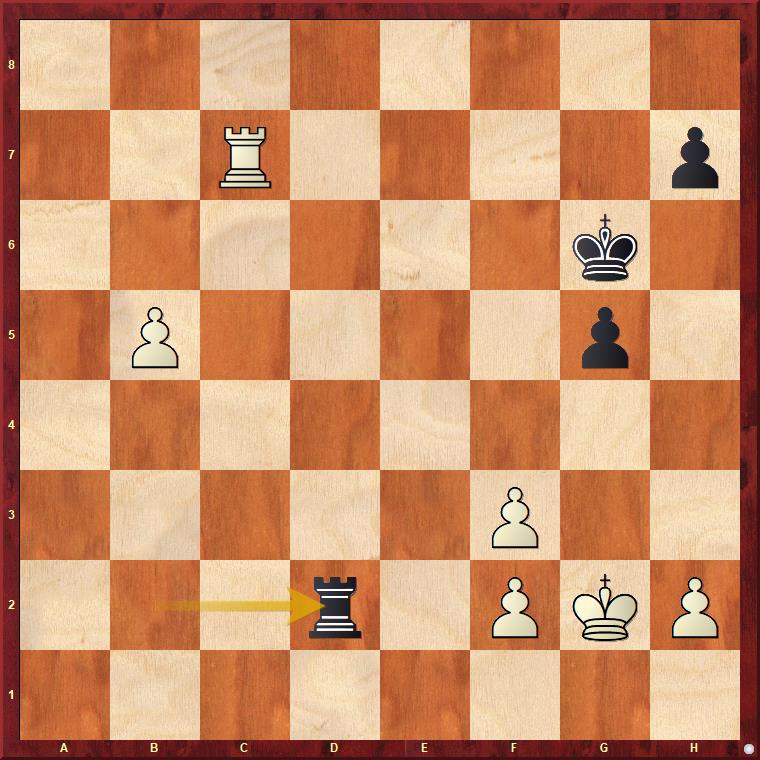
From a didactic point of view, we probably cannot choose a better position for setting a test.
White had (in perspective) three ways to control her distant passed pawn with the rook. If today's youth still read books (their advantage is that we can always turn again to the relevant chapter and passage and repeat the required material), she would surely remember Tarrasch's rule. I find it hard to believe that Divya did not know it. She simply – perhaps in the heat of battle – forgot it...
I will ask an unusual question: Having been instructed by the article, how would you definitely not continue in your own game?
Below, readers can watch Sagar's game record again. A rook endgame arises at approximately 13.45 minutes into the video.
Makarychev's didactically valuable video analysis can then be found by the reader from the 26th minute.
Finally, we can calmly study both examples with RRP ‚b‘.
The second example is significantly more complicated simply because both opponents made a number of mistakes. For less experienced readers however, it is, important above all to master the basic principles of these.
endgames. Let us realise that the rook is the strongest piece on the chessboard and its activity is therefore crucial for success. The endgame of the game Divya Deshmukh vs. Tan Zhongyi at least to me, seemed as if both opponents forgot this!
In the player below, all examples and games used in the article are again available. For clearer study, I recommend downloading them.